Nuix Discover configuration
After you install the Nuix Discover application, there is a list of configuration tasks to complete, including:
Request Nuix Discover license
Log in to Nuix Discover for the first time
Configure Servers
Configure File Repositories
Configure Settings
Login Service settings
User Administration
Configure user settings
Improve native audio and video
Use the following procedures to configure Nuix Discover.
Request Nuix Discover license
After you complete your installation of Nuix Discover, follow this procedure to use the Nuix Discover License Management website to register the licenses of your Nuix Discover installation. You must be licensed to use any Nuix Discover software application or utility.
Note: The Nuix Discover license key is valid only for the current server. If you move Nuix Discover to a different server, contact Nuix for a new key.
Request a license key
Use the procedure described in the following table to request a license key.
|
Step |
Procedure |
|
|
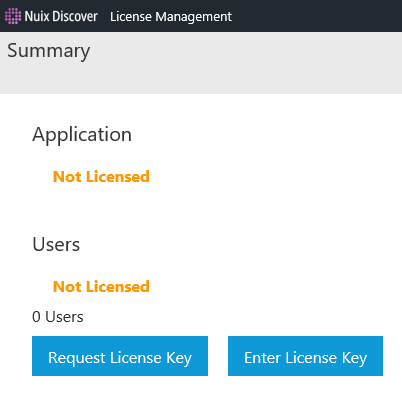
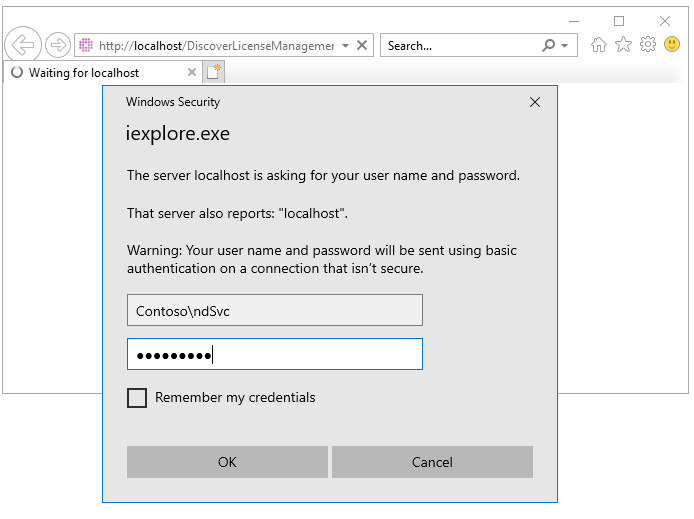
On each Nuix Discover Web server, with a Web browser open the following URL: http://localhost/ringtaillicensemanagement. |
|
|
|
2 |
When prompted for credentials, you can use any local administrator. Do not forget to add the domain.
|
|
|
3 |
On the License Management page, click Request License Key. Note: As of Nuix Discover release 10.15, the Application license is no longer required.
|
|
|
4 |
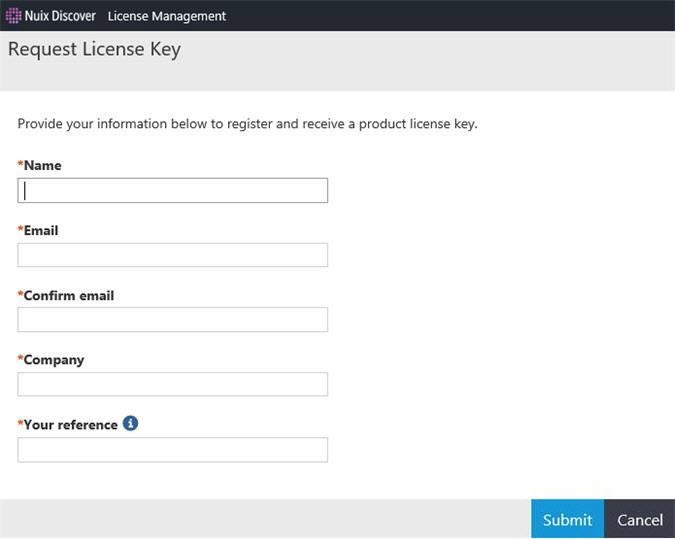
Complete the Request License Key form with your details: Name Email address Company name License reference details
Note: In the Your reference field, type your own reference details. These details help you differentiate between license keys, which is important if you are licensing multiple Nuix Discover web servers or environments. All fields are mandatory. |
|
|
5 |
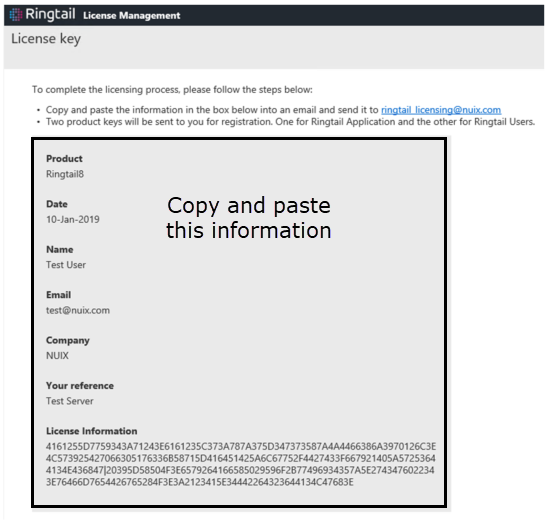
Click Submit to generate the license key request. The License key window displays the information you have entered, as well as a long string of characters under License Information.
|
|
|
6 |
Repeat this process for each Nuix Discover Web server. |
|
|
7 |
Copy the entire page of license request information, shown in the previous figure, and send it to ringtail_licensing@nuix.com. The Nuix Support team will confirm your license and return your license key. The support team might take longer to respond to license requests outside of normal business hours. Warning: Copy and paste the information as instructed. Do not send a screenshot. |
|
|
8 |
Click OK to continue. |
|

Enter the license key
Your license consists of two keys: one for the web application server (referred to as the Ringtail license) and one for the number of maximum users for your installation (referred to as the Portal license). You need both keys for a licensed Nuix Discover configuration. If you license multiple web servers, you need to enter the Ringtail license for each server, but you only need to enter the Portal license (user count) once. When you request a license, Nuix confirms your license and emails the license keys to you. The following is an example of the license keys:
Your registration key for Ringtail is: 2D3B245B654468343C40136C5827622251514E596E69736543
3A743D58792D402712703A3A126B214873134A5165264A3441
21543247546426263B27532741545E28345F2F274F6063
Your reference is MYEXTRANETSERVER, 10 Users
Use the procedure described in the following table to enter the license key in Nuix Discover.
|
Step |
Procedure |
|
|
1 |
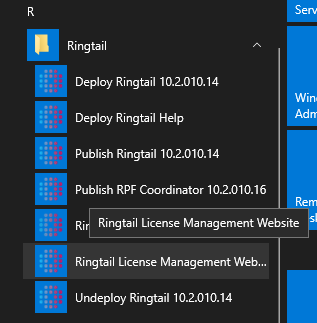
On the web server, on the Windows Start menu, select Ringtail > Ringtail License Management Website.
|
|
|
2 |
When prompted for credentials, you can use any local administrator. Do not forget to add the domain.
|
|
|
3 |
On the License Management page, click Enter License Key. Note: Beginning with Nuix Discover version 10.15, the Application licence key is not required.
|
|
|
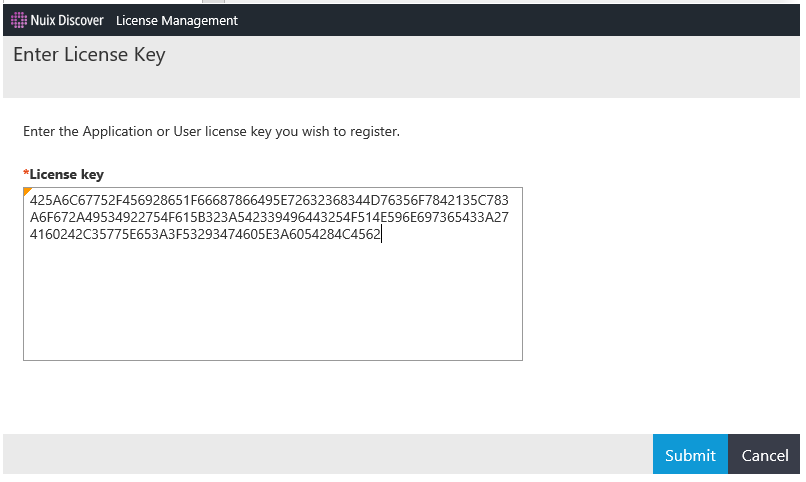
4 |
Copy and paste the first license key into the License key box, and then click Submit.
|
|
|
5 |
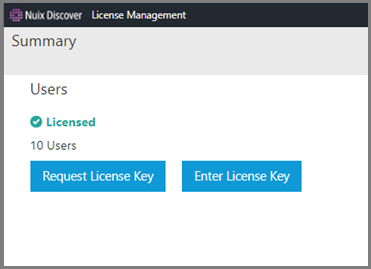
Repeat step 2 to submit the second license key. When you have applied both license keys, the License Management page displays the number of users for which you are licensed.
|
|

Log in to Nuix Discover the first time
To log in to Nuix Discover for the first time, use the Nuix Discover Service Account (as described in the Service account section of the Planning chapter) that you entered in step 4 of the Create the Portal and RPF database section.
Configure Servers
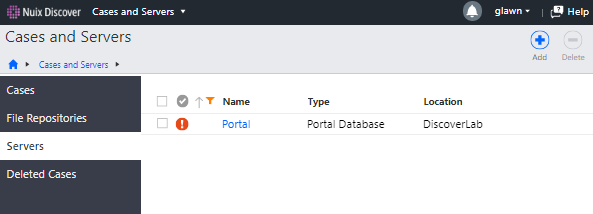
Only system administrators can access all the options available on the Cases and Servers page. Portal administrators and portal users can access the options for the cases for which they are case administrators.
Servers
System administrators use the Servers page to manage the following servers:
Portal: You must update the portal before you configure any other servers. You only need to do this one time, when you install Nuix Discover.
Database servers: Host the SQL Server databases for cases.
Analysis servers: The SQL Server analysis servers used for data analysis. Adding an analysis server is optional but required if you use the Cubes features.
Note: Before creating a case, the system administrator must configure at least one database server. You can also add one or more analysis servers.
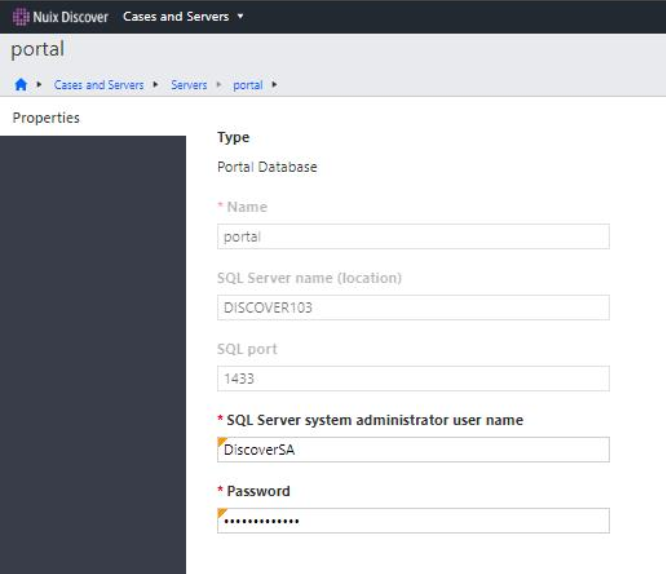
Update portal
Log in to Nuix Discover as a System Administrator and use the procedure described in the following table to update the portal.
|
Step |
Procedure |
|
|
1 |
On the Portal Home page, under Portal Management, click Cases and Servers and then select Servers. |
|
|
2 |
A Portal record appears showing an error state the first time you access the portal. Click the Portal link to open the portal record.
|
|
|
3 |
On the portal page, update the following fields: SQL Server system administrator user name: The Nuix Discover SQL Admin as described in the Service account section of the Planning chapter. Password: The password for the above account.
|
|
|
4 |
Click Save. Note: After you save the portal, it no longer appears in the list of servers. |
|
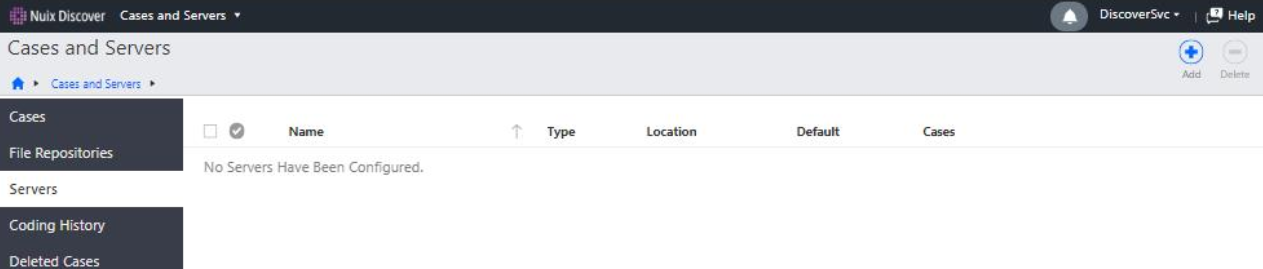
Add servers
When adding a server, the application requires that a Nuix Discover system administrator enter all configuration information.
You are creating connections to add servers to the SQL database server(s) and the SQL analysis server(s). You must have at least one SQL database server before you can create a case.
Only one server of each type can be a default server. The first server added of a particular type becomes the default. You can change the default server if needed.
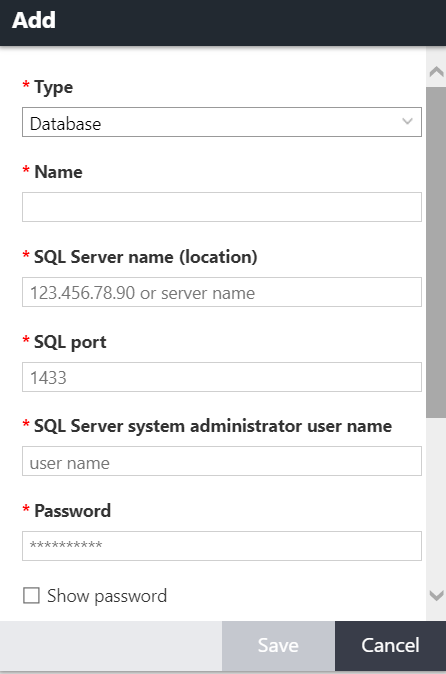
Use the procedure described in the following table to add a server.
|
Step |
Procedure |
|
|
1 |
On the Portal Home page, under Portal Management, click Cases and Servers. |
|
|
2 |
In the navigation pane, click Servers. |
|
|
3 |
Click Add.
|
|
|
4 |
In the Type list, select the server type. You can choose Database or Analysis. Note: You must create at least one database.
|
|
|
5 |
Type a Name for the server. The server name can only be used once for each type of server. Different types of servers can use the same name. Note: Do not start a server name with a number. |
|
|
6 |
If you selected Database for the Type field, complete the following: SQL Server name (location): Hostname or the alias for the server. SQL port: Enter the port used for connecting to SQL Server. SQL Server System Administrator user name and Password: Type the system administrator credentials here and you no longer need to re-enter them when creating the case. This is the Nuix Discover SQL Admin as described in the Service account section of the Planning chapter above. SQL Server database user name and Password: The credentials used for the web user account, and which the application uses to access the case database. This is the SQL Web User as described in the Service account section of the Planning chapter. Show password: Select to display the password instead of asterisks in this dialog box only. Set as the default server: Select to make this the default database server. If you selected Analysis for the Type field, complete the following: Server name (location): The Hostname for the server. Note: DNS Aliases cannot be used for Analysis servers. Analytics system administrator user name and Password: User credentials to connect to the analysis server. The user name is in the format (domain\username). This usually is the Nuix Service Account as described in the Service account section of the Planning chapter. Show password: Select to display the password instead of asterisks in this dialog box only. Set as the default server: Select to make this the default analysis server. |
|
|
7 |
Click Save. A message appears indicating whether the server was successfully added. |
|
File Repositories
You must set an internal file repository. A file repository is the network location (network share) where you connect the application to where you are going to store your files. Only a system administrator can add a file repository.
An external file repository is optional and is an Amazon AWS S3 bucket. External file repositories can be used for file transfers only.
When adding a file repository on the Portal Management > Cases and Servers > File Repositories page, you can choose between an Internal or External file repository type. The external repository type enables you to add an external repository, such as cloud storage, which can be accessed from the Manage Documents > File Repositories page in a case.
Add an internal repository
Use the procedure described in the following table to add an internal repository.
|
Step |
Procedure |
|
|
1 |
On the Portal Home page, under Portal Management, click Cases and Servers. |
|
|
2 |
In the navigation pane, click File Repositories. |
|
|
3 |
Click Add. |
|
|
4 |
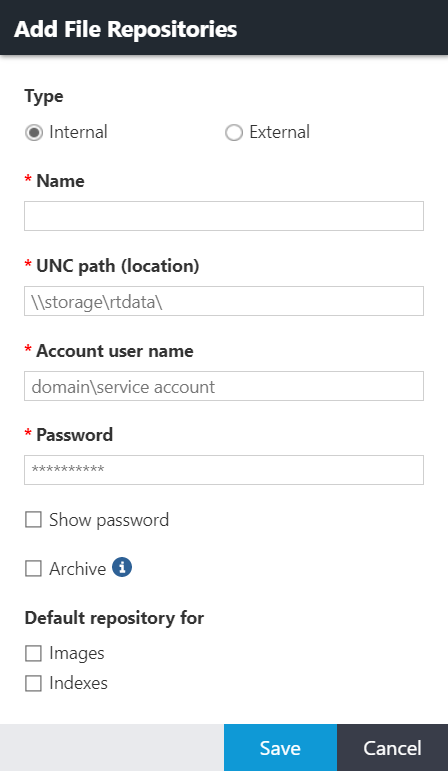
In the Add File Repositories dialog box, enter information for the following fields. An asterisk indicates a mandatory field. Type: The type of file repository. Select Internal. Name: Type a name for the file repository. The name must be unique for that type of file repository. UNC path (location): Type the path to the file repository. Account user name: Type the user name in the format domain\username. This is the Nuix Service Account as described in the Service account section of the Planning chapter above. Password: Enter the password to use to connect to the file repository. Click Show password to view the characters in the password. Archive: Click this check box if the file repository will be used as an archive repository, meaning it will be used to store archived files and decommissioned cases. Important: If you are creating an archive repository, the UNC path location must not be a subfolder on any other internal repositories. Default repository for: The Images and Indexes check boxes are cleared by default. Click to set this repository as the default for images or indexes. You can have only one default file repository for Images and Indexes.
|
|
|
5 |
Click Save. A message appears indicating whether the repository was successfully added. Note: You must have an internal file repository. An external file repository is optional. |
|
Add a file transfer repository (optional)
By default, a file transfer repository is included in an Image and Index repository but can be a different file share. A transfer repository contains the folders for the files staged for import, export, ingestion, upload, or download in the application. Transfer repositories typically have different NTFS permissions so that portal administrators and power users can copy files to be imported or ingested or that have been exported.
The procedures to create a transfer repository are the same as the above except you cannot set it as the default for images or indexes.
Add an external file repository (optional)
You can also set an external file repository. If you have data stored in your Amazon Web Services (AWS) cloud in an S3 bucket, you can create an external file repository that connects Nuix Discover to that bucket. You can assign that repository to be accessed from a Nuix Discover case or cases. You can have many external file repositories. You can copy data directly from your S3 bucket to and from Nuix Discover.
When adding a file repository on the Portal Management > Cases and Servers > File Repositories page, you can choose between an Internal or External file repository type. The external repository type enables you to add an external repository, such as cloud storage, which can be accessed from the Manage Documents > File Repositories page in a case.
After adding an external file repository, you can transfer files between your external repository and repositories. For example, you can copy files from your Amazon S3 storage to the ingest staging folder on a file transfer repository, and then add the files to an ingestions job.
Currently, only Amazon S3 is available as an external repository type.
Use the procedure described in the following table to add an external repository.
|
Step |
Procedure |
|
|
1 |
On the Portal Home page, under Portal Management, click Cases and Servers. |
|
|
2 |
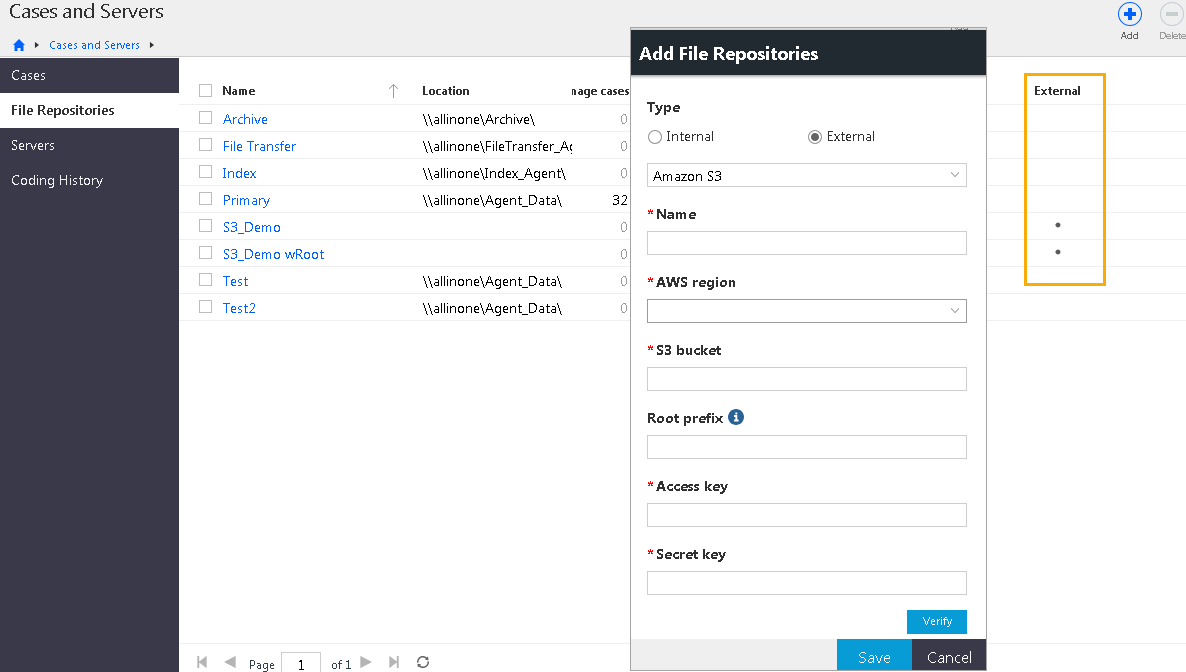
In the navigation pane, click File Repositories. Note: On the portal File Repositories page, a dot in the External column indicates an external repository. |
|
|
3 |
Click Add. |
|
|
4 |
In the Add File Repositories dialog box, enter information for the following fields. An asterisk indicates a mandatory field. Type: The type of file repository. Select External. Name: Type a name for the file repository. The name must be unique for that type of file repository. Type Amazon S3 AWS region: Select from the list of available regions. S3 bucket: Type a name for the S3 bucket. Root prefix: Optionally, type the name of a specific area within the S3 bucket to limit access to that area. Access key: Type the access key from Amazon Web Services. Secret key: Enter the Secret key.
|
|
|
5 |
Click Verify to test the connection to the specified S3 bucket using the access key and secret key values. |
|
|
6 |
If the verification is successful, click Save to create the external file repository. |
|
|
7 |
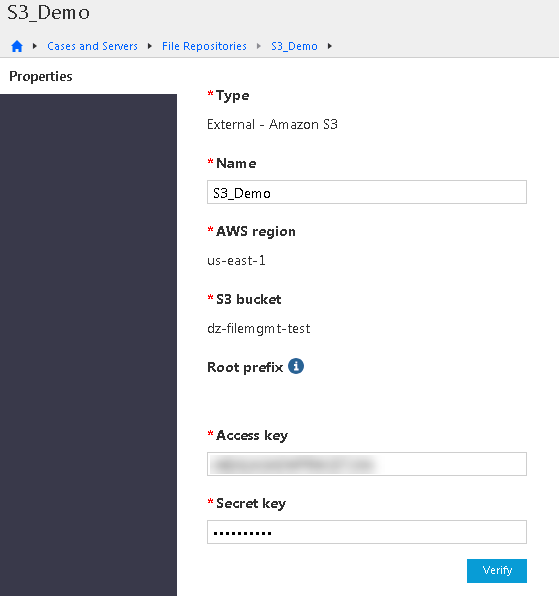
If unsuccessful, check the information and fix any spelling errors before you click Verify again. A small error can cause the connection to fail. The Properties page for external file repositories displays the information that was added. You can edit the repository name, access key, and secret key on this page. If you change either key value, you must click Verify to verify the connection again.
|
|
|
8 |
When the verification is successful, click Save. |
|
Configure settings
There are many system settings that you can configure for users. Some are required and others are optional. The types of settings you can configure include:
Service account in the Nuix Discover portal (required)
Portal options (some are required, and some are optional)
Content search service URL (required)
Office Online URL (required)
Enable PDF annotations (required)
Connect API URL (optional)
Hit highlight service URL (optional)
RPF Supervisor temporary folder (optional)
Enable server certificate validation (optional)
Set Ingestion Licensing Server (optional)
User audit archive configuration (optional)
User audit log service Elasticsearch API key (optional)
User audit log service URL (optional)
Enable activity history audit for portal management activities (optional)
Enable activity history audit in new cases (optional)
Audio transcription service configuration (optional)
Enable organizations security (optional)
Native viewer WOPI URL (optional)
URL for Mobile Binders Web service (optional)
Set Help Options and Login Service (optional)
Translation Services (optional)
Aspera Connect Server (optional)
Read more about these settings in the following sections.
Set Service Account (required)
This setting specifies the account for the RPF to run jobs. The application validates and saves the account credentials and assigns the account to cases. Only system administrators can access this option.
Use the procedure described in the following table to manage the service account.
|
Step |
Procedure |
|
1 |
On the Portal Home page, under Portal Management, click Settings. |
|
2 |
On the Settings page, click Set Service Account. |
|
3 |
Type the Account user name and Password. Use the Nuix Discover Service Account as described in the Service account section of the Planning chapter.
Note: Omit the domain name from the Account user name. |
|
4 |
Click Save. |
Set the RPF Coordinator (required)
The RPF Coordinator is a web service that creates and monitors jobs and assigns work to the supervisors by communicating between Nuix Discover and the RPF database. As supervisors become available, the coordinator distributes discrete quantities of work to each supervisor. The supervisor then distributes subtasks to its various workers. The coordinator server also hosts the RPF_Workers file share, which the supervisors access to download their workers.
Use the Portal Management > Settings to configure the credentials for the RPF Coordinator. You can also edit these settings later.
Caution: Change coordinator settings only when necessary, as this can affect Nuix Discover performance.
In Nuix Discover, use the procedure described in the following table to add or edit the coordinator settings.
|
Step |
Procedure |
|
|
1 |
On the Portal Home page, under Portal Management, click Settings. |
|
|
2 |
On the Settings page, click RPF Coordinator. |
|
|
3 |
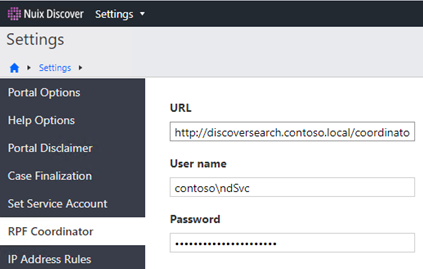
On the RPF Coordinator page, in the URL box, type or edit the URL to the computer that is running the coordinator. The form of the URL is: http://<coordinator-hostame>/Coordinator
|
|
|
4 |
In the User name box, type the domain and account name of the Nuix Discover Service account as described in the Service account section of the Planning chapter above. |
|
|
5 |
In the Password box, type the administrator password for the Service account. |
|
|
6 |
Click Save. |
|
Portal Options
To use some application features, you must provide values for portal options. There are two types of portal options, required and optional. You must set all required portal options before Nuix Discover is operational.
Only system administrators can change these values.
The application portal options are settings that administrators can change to alter the behavior or appearance of the entire portal and, in some situations, all the cases in the portal. Only system administrators can access and edit portal options.
Some settings are also set at the case level. A case setting must also have the setting enabled at the portal to be effective. For example, if the Enable PDF annotations setting is enabled at the case level but not at the portal level, it is effectively not enabled for the case.
Use the procedure described in the following table to manage portal options.
|
Step |
Procedure |
|
|
1 |
On the Portal Home page, under Portal Management, click Settings. |
|
|
2 |
On the Portal Options page, edit options as need. Hover over the tooltip for a description of each option. Note: The options described in this topic are grouped by category. The options in the application appear in alphabetical order. |
|
Required Settings
Some of the Portal Options must be set, including:
Content search service URL
Office Online URL
Enable PDF annotations
Content search service URL (required)
Log in to Nuix Discover as a System Administrator and use the procedure described in the following table to configure the Content search service URL.
|
Step |
Procedure |
|
|
1 |
On the Portal Home page, under Portal Management, click Settings. |
|
|
2 |
On the Portal Options page, set the Content search service URL portal option to: http://<server>/Content-Search/api/search/
|
|

Office Online URL (required)
Log in to Nuix Discover as a System Administrator and use the procedure described in the following table to configure the Office Online URL.
|
Step |
Procedure |
|
|
1 |
On the Portal Home page, under Portal Management, click Settings. |
|
|
2 |
On the Portal Options page, do the following: In Office Online URL box, type the URL to your organization’s Office Online Server.
|
|

Enable PDF annotations (required)
Enable the PDF redaction functionality for cases in this portal. You must also select this portal option to use the Enable PDF annotations case option. When enabled in both the portal and the case, users can:
Add redactions, highlights, and notes to PDF documents.
Include PDF files as images in a production. These files can be endorsed.
Control the resolution of PDF page rendering when endorsing PDFs in a production.
Use page level granularity, which means users can work on individual pages of PDF documents.
Use the Find and Redact feature.
Optional Settings
Read the following sections to learn more about the optional portal settings.
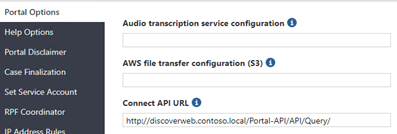
Connect API URL (optional)
If you have installed the optional Connect API, log in to Nuix Discover as a System Administrator and use the procedure described in the following table to configure the service.
|
Step |
Procedure |
|
|
1 |
On the Portal Home page, under Portal Management, click Settings. |
|
|
2 |
On the Portal Options page, set the Connect API URL portal option to http(s)://<address>/Portal-api/api/query/
|
|
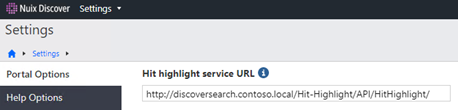
Hit highlight service URL (optional)
Log in to Nuix Discover as a System Administrator and use the procedure described in the following table to configure the Hit highlight service URL.
|
Step |
Procedure |
|
|
1 |
On the Portal Home page, under Portal Management, click Settings. |
|
|
2 |
On the Portal Options page, set the Hit highlight service URL portal option to: http(s)://<address>/Hit-Highlight/api/HitHighlight/
|
|
RPF Supervisor temporary folder (options)
The path to the base folder for the RPF Supervisor to use for temporary data in the RPF Supervisor temporary folder field. If no value is specified for this option, the default value is: C:\WINDOWS\Temp. If using a different drive letter, all RPF Supervisors must have the same drive letter and path.
Enable server certificate validation (optional)
If you select this option, the following services will not operate until they have a valid SSL certificate:
Login
Aspera
Search
Hit highlight
Office Online Server
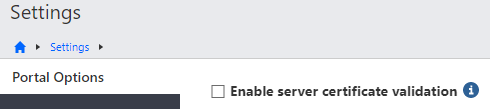
Note: If you select this option and a service does not operate due to an invalid SSL certificate, you are prompted to contact your administrator, and the application writes an error to the error log.
Set Ingestion Licensing Server (optional)
Ingestions is an optional RPF worker which requires an additional license that allows clients to process unstructured data sets (which can include native files and emails), extract metadata, and load processed data directly into Nuix Discover. Enter the host name or DNS alias of the Nuix Management Server that hosts the processing licenses.

User audit archive configuration (optional)
The user audit archive configuration is a JSON configuration string to configure a temporary Elasticsearch snapshot location used by Case Decommission feature.
For the User audit archive configuration setting, update it with the JSON configuration string containing the Elasticsearch snapshot repository location.
{"ElasticsearchSnapshotRepositoryLocation":"\\\\servername\\archive\\esBackups","TimeoutInMinutesForSnapshotCreation":120,"PollingIntervalInSeconds":20}
Edit this config string (\\\\servername\\archive\\esBackups) to point to the “esBackups” folder in the Archive File Repository, which is the same location configured in Coding History configuration.
Note: Be sure to double escape the backslashes for the path in the JSON string, as shown in the previous example.
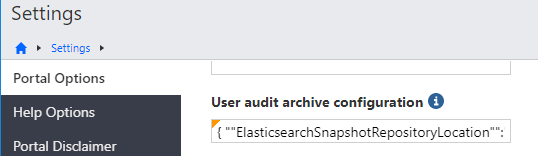
Note: Only a portion of the string appears in the text box.
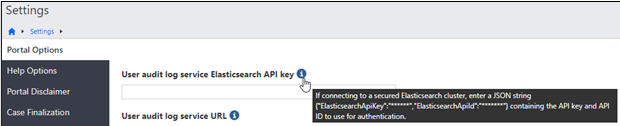
User audit log service Elasticsearch API key (optional)
To use a secured Elasticsearch cluster, in the User audit log service Elasticsearch API key box, type the Elasticsearch API key and API ID as a JSON string.
User audit log service URL (optional)
For the User audit log service URL portal option, type the URL that contains the host name of the audit log service machine and the port, 10003.
Note: After the user audit log service is installed and the URL is configured, new cases automatically have coding history enabled. All coding decisions made by reviewers are logged.

Enable activity history audit for portal management activities (optional)
If selected, the application enables the user activity history audit feature for in the Portal Management area.
Warning: Activity history audit is a beta feature and should not be enabled without careful consideration. Once you enable this feature you cannot disable it.
Enable activity history audit in new cases (optional)
If selected, the application enables the user activity history audit feature for new cases.
Note: This feature requires the User audit log service and the Elasticsearch to be deployed in the portal environment.

Audio transcription service configuration (optional)
The Audio transcription service configuration value should be written in JSON object syntax and include the key/value pairs described in the following table.
|
Key |
Value |
|
URL |
The IBM Watson Speech to Text service endpoint URL with the following parameters: /v1/recognize?timestamps=true&model=en-US_NarrowbandModel&inactivity_timeout=-1 |
|
Key |
Your API key for the IBM Watson Speech to Text service |
|
TimeoutInSeconds |
The number of seconds the code will wait for a response. |
Example:
{"Url":" https://gateway-wdc.watsonplatform.net/speech-to-text/api/v1/recognize?timestamps=true&model=en-US_NarrowbandModel&inactivity_timeout=-1","Key":"******","TimeoutInSeconds":7200}
Note: After saving the configuration setting, the key value will be replaced with *** in the display of the configuration string. Therefore, when modifying the configuration string, the entire string, including your API Key value, needs to be repopulated and saved.
Note: This functionality is enabled through third-party API integration with IBM. For information about licensing and how to sign up for this service, see the following link: https://www.ibm.com/watson/services/speech-to-text.
Enable organizations security (optional)
When enabled, users may be assigned only to cases associated with one of their organizations, and portal administrators may manage only users and cases associated with their organization. This option cannot be disabled once enabled.
Selecting this option enables security for the Organizations feature in the application, with the following effects:
Portal administrators who are members of a provider organization can access the Organizations feature.
Portal administrators can manage only the cases and users associated with their organization.
Users can be assigned to only the cases associated with their organization.
Important: After you enable the option, the option is no longer visible on this page. If you enable the option in error, contact Nuix Support for instructions on how to disable the option.
Native viewer WOPI URL (optional)
This is the URL to the application-specific implementation of the Web Application Open Platform Interface (WOPI). This field should be left blank unless directed by Nuix Support.
URL for Mobile Binders Web service (optional)
If you are using the Mobile Binders feature to work offline on an Apple iPad device, deploy the Web Service. Nuix Discover users can review key documents offline using the Mobile Binders app on an Apple iPad device. To configure the Mobile Binders feature, follow the procedure in this section.
For more information about setting up Mobile Binders, see Mobile Binders.
Enable mobile binders for a case
Use the procedure described in the following table to enable the Mobile Binders feature for the case.
|
Step |
Procedure |
|
1 |
On the Portal Home page, under Portal Management, click Settings. |
|
2 |
On the Settings page, on the Portal Options page, provide the URL for Mobile Binders Web service in either format: https://servername/RingtailWebservices/ or http(s)://<address>/RingtailWebservices/
|

Set Help Options and Login Service (optional)
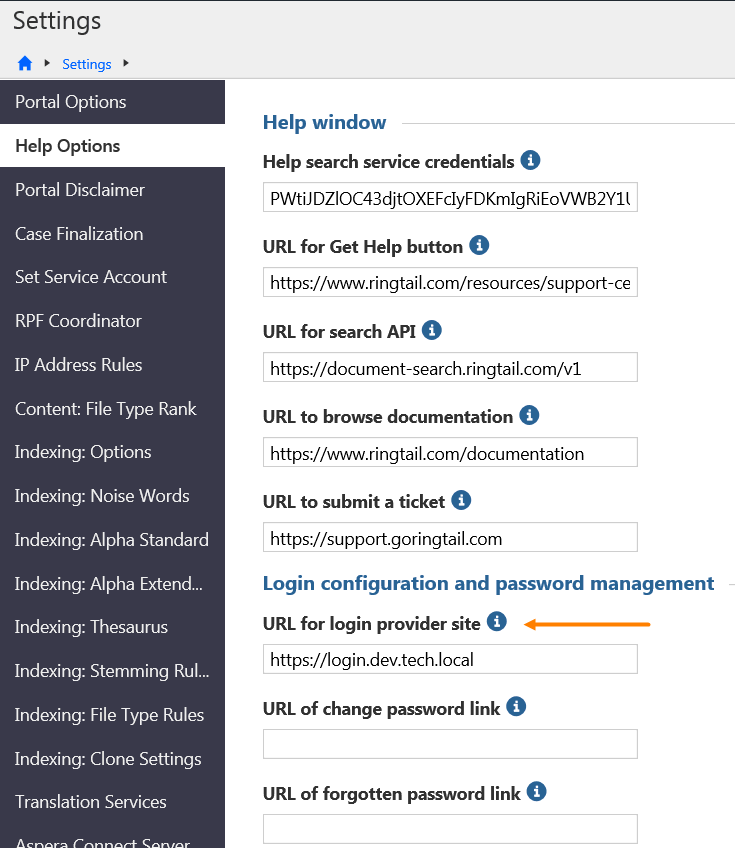
On the Portal Management > Settings > Help Options page, you can configure the help options and the Login Service.
Configure the online help
A Help button is located on the navigation bar, next to the user name menu. There are two ways to access help. You should choose the best method for your environment.
Installed help is the browser-based help, allowing users to search for information or to navigate using the table of contents. You must use the installed help if users do not have Internet access.
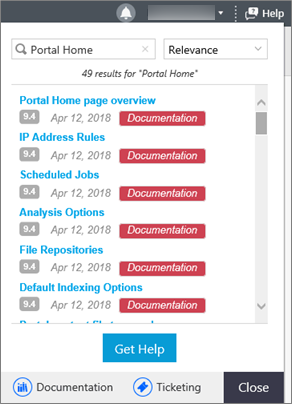
The external online help searches for content based on the Nuix Discover page that you are using when you click the Help button. You can use the search box in the Help window and get results from a variety of resources. You can also add links for your users to submit a support ticket or contact customer support. Nuix Discover Web servers require internet access for the online help to work.
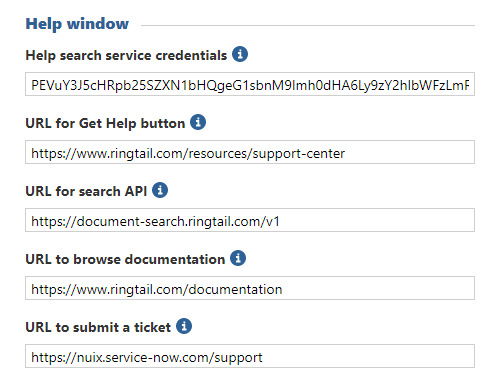
Note: If you do not have internet access available, or if you want to use the latest version of the installed help, remove the URLs from the fields on the Help Options page, including Help search service credentials, URL for Get Help button, URL for search API, URL to browse documentation, and URL to submit a ticket.
The following figure shows the online help window.
Use the procedure described in the following table to configure online help for your environment.
|
Step |
Procedure |
|
|
1 |
If your users can access the Internet and would like to view the online help that it is currently posted on ringtail.com, skip to step 4. Note: The online help on ringtail.com is available only for Nuix Discover 10.0 and older. |
|
|
2 |
On the Portal Home page, under Portal Management, click Settings. |
|
|
3 |
On the Help Options page, remove all the default URLs and then click Save.
|
|
|
4 |
To use the online help, when you install this version of the application, your environment automatically references the help on www.ringtail.com. If needed, you can change the defaults on the Portal Management > Settings > Help Options page. Help search service credentials: Encrypted credentials for accessing the user help search API, which runs searches for help content on www.ringtail.com. This value is populated by default with the encrypted credentials. URL for Get Help button: Web address or email address for users to contact support from the Help menu. If you leave this value blank, the Get Help button does not appear in the Help window. URL for search API: Web address of the user help search API, which provides suggested search results on the Help menu. If you leave this value blank, the suggested results do not appear in the Help window. URL to browse documentation: Web address of the documentation web site. Note: The installed help opens if Nuix Discover is offline. URL to submit a ticket: Web address or email address for users to submit a support ticket using the Help window. If you leave this value blank, the Ticketing button does not appear in the Help window. |
|
Set URL for login provider site (optional)
To configure your login provider site or any of the identity provider settings, refer to the following documents for more information:
Configuring Active Directory Federation Services with Nuix Discover for Single Sign-On
Configuring Okta with Nuix Discover for Single Sign-On
Configuring Duo with Nuix Discover for Two-Factor Authentication
Use caution with this option. After it is set from the front end, it disables the traditional Login screen. If there is an error in configuration, this setting can be reverted back by executing the following SQL on the portal database:
USE portal
SET thevalue =''
WHERE thelabel ='URL FOR LOGIN PROVIDER SITE'
Note: The “ is two single quotes. Put a single quote and not a double quote.
Note: To read learn more about configuring the Login Server, see Configure Login Service.
Translation Services (optional)
To add configuration information for Google or Microsoft machine language translation services for a portal, a system administrator must provide the configuration.
Important: On-premises clients must have their own Google or Microsoft translation services. For information about the Microsoft translation service, see https://docs.microsoft.com/en-us/azure/cognitive-services/Translator/translator-text-how-to-signup. For information about the Google translation service, see https://cloud.google.com/translate.
Use the following procedure to add configuration information for Google or Microsoft.
On the Portal Management > Settings > Translation Services page, provide the configuration information for Google, for Microsoft, or for both translation services. A configuration consists of the URL, the key, and the timeout in a JSON string.
The configuration string and following elements are defined below:
Set Google API (optional)
Write the JSON object syntax and include the key/value pairs described in the following table to set the Google configuration value.
|
Key |
Value |
|
ConcurrentCalls |
The number of concurrent calls made from an RPF worker process or web server. |
|
DelayBetweenBatchesInMs |
The delay between each batch of concurrent calls. For example, if set to 1000, after making 10 concurrent calls the code will wait for 1000 milliseconds before making another 10 concurrent calls. |
|
CharacterLimits |
The maximum number of characters sent in each call. |
|
Key |
Your API key for the Google Cloud Translation API |
|
URL |
The Google Cloud Translation API endpoint URL |
|
TimeoutInSeconds |
The number of seconds the code will wait for a response. |
Example:
{"ConcurrentCalls":10,"DelayBetweenBatchesInMs":0,"CharacterLimits":10000,"Key":"******","Url":"https://translation.googleapis.com/language/translate/v2","TimeoutInSeconds":10}
Note: After saving the configuration setting, the key value will be replaced with *** in the display of the configuration string. Therefore, when modifying the configuration string, the entire string, including your API Key value, needs to be repopulated and saved.
Set Microsoft API (optional)
Write the JSON object syntax and include the key/value pairs described in the following table to set the Microsoft configuration value.
|
Key |
Value |
|
ConcurrentCalls |
The number of concurrent calls made from an RPF worker process or web server. |
|
DelayBetweenBatchesInMs |
The delay between each batch of concurrent calls. For example, if set to 1000, after making 10 concurrent calls the code will wait for 1000 milliseconds before making another 10 concurrent calls. |
|
CharacterLimits |
The maximum number of characters sent in each call. |
|
Key |
Your API key for the Microsoft Translator API |
|
URL |
The Microsoft Translator API endpoint URL |
|
TimeoutInSeconds |
The number of seconds the code will wait for a response. |
Example:
{"ConcurrentCalls":4,"DelayBetweenBatchesInMs":1800,"CharacterLimits":4999,"Key":"******","Url":"https://api-nam.cognitive.microsofttranslator.com/translate?api-version=3.0","TimeoutInSeconds":30}
Note: After saving the configuration setting, the key value will be replaced with *** in the display of the configuration string. Therefore, when modifying the configuration string, the entire string, including your API Key value, needs to be repopulated and saved.
Set Aspera Connect Server (optional)
IBM Aspera is a solution that allows you to quickly upload and download files using its Fast, Adaptive, and Secure Protocol (FASP) over the public Internet. Aspera integration with Nuix Discover is optional and requires a separate Aspera Connect Server and a client-side plug-in for each client computer using Nuix Discover for fast file transfer. If the application is only used behind the firewall, Aspera is not necessary.
Before using the plug-in, system administrators must contact Aspera (http://asperasoft.com/) to purchase and configure the Aspera Connect Server.
For information about configuring and integrating Aspera, see the following support document: Nuix Discover Quick Reference – Configure Aspera for Nuix Discover for SaaS.
Note: If your client host is behind a firewall that does not allow outbound connections, you must allow the following:
٠Outbound connections for HTTPS over TCP on port 443
٠Outbound connections for SSH over TCP on port 33001
٠Outbound connections for FASP transfers over UDP on port 33001- 33100
Configure Login Service
To configure the Login Service, you must add and configure identity provider settings. This section explains how to add and configure identity provider settings and how to troubleshoot.
Note: To learn more about Login Service configuration, see Set URL for login provider site (optional)
Add and configure identity provider settings
After the Login Service is running, you must configure the application to work with your identity provider. After you add an identity provider configuration, you also have the option to add a 2FA provider.
Note: When no identity provider configurations exist, the application checks the portal web configuration and determines if Ringtail authentication or AD authentication is in use. The application creates the corresponding identity provider configuration and assigns it as the portal default identity provider configuration.
If you are already using Nuix Discover 10.0.009 or higher, before you install the Login Service, you should have a default identity configuration present.
Use the procedure described in the following table to add the identity provider configuration for your environment to the application.
|
Step |
Procedure |
|
1 |
On the Portal Home page, under Portal Management, click User Administration. |
|
2 |
In the navigation pane, click Identity Provider Settings. The Identity Provider Settings page lists each Configuration name, Provider name, Two-factor provider name (if two-factor authentication is configured) and a check by the Default configuration. |
|
3 |
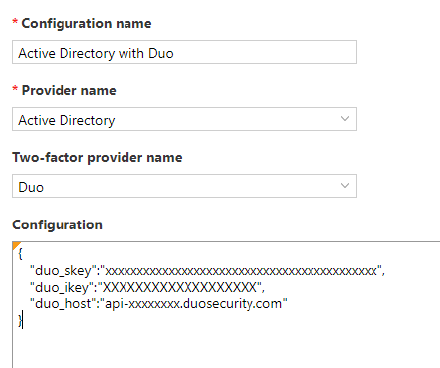
Click Add, and in the Add Identity Provider dialog box, do the following: Type a new configuration name in the Configuration name box. Select the Provider name list. Depending on your installation, you will see Ringtail, Active Directory, or third-party identity providers listed. Type an optional two-factor provider name in the Two-factor provider name box. Use the optional Configuration field to store configuration information that may be required by the identity provider, such as license keys. The value in this field should be in JSON format. Click Save. Note: If you select Set as the default identity provider, the application replaces the current default with this new configuration. You can have only one default identity provider configuration for a portal. The following figure show a sample JSON for a Duo configuration. It is possible to combine the JSON for both an identity provider and two-factor provider in the Configuration box.
|
|
4 |
On the Portal Home page, on the Portal Management > Settings page, click Help Options, and do the following: In the URL for login provider site box, type the URL where the Login Service is hosted. Click Save.
|
|
5 |
In the Command Prompt window on the web server, restart IIS by running the IISRESET command. |
Login page for the Login Service
When the Login Service is in use, your users see the Nuix Discover login page.
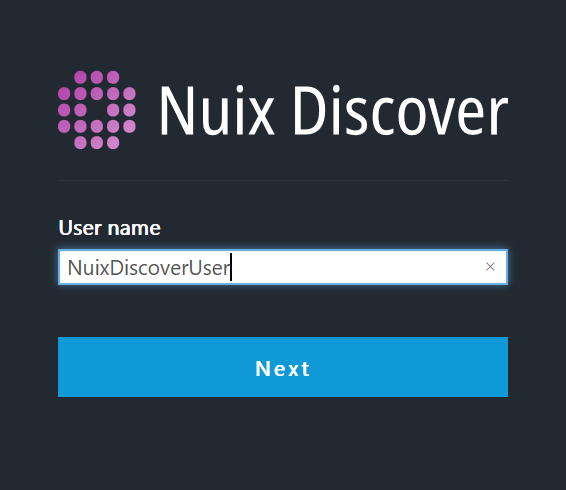
After entering a user name, users are directed to the separate sign-in page for the identity provider, where they re-enter their user name, and then enter the password to log in.
If you configure your user accounts to require two-factor authentication, after users log in, the application directs the users to a page where they select an authentication method for the account that uses, for example, a mobile phone or a temporary passcode.
Note: As a best practice, and to ensure a seamless login experience, we recommend that you remind your users to replace any bookmarks they created with the original URL that you gave them. Alternatively, after users log in, they can bookmark the URL for the Portal Home page but should avoid bookmarking the URL for the Login page.
Note: To troubleshoot the Login Service, see Appendix F. Troubleshoot Login Service.
User Administration
The User Administration page is used to configure authentication settings, import users, and assign users to cases. There are two authentication services that can be deployed in Nuix Discover: Web server or Login Service.
Administrators can add and manage users and their case assignments on the User Administration page. However, before performing tasks such as adding and managing users, the system administrator must configure the appropriate settings. The settings that are configurable based on the authentication service and method chosen. For additional information please see the Authentication Method Matrix.
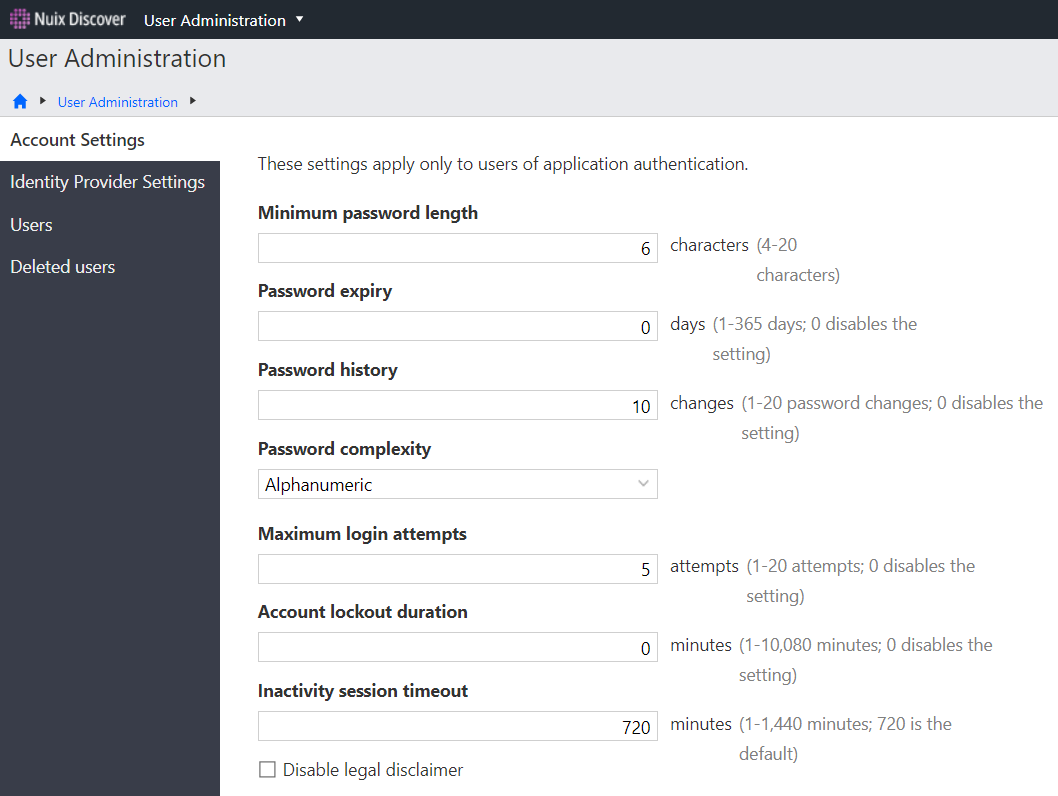
Configure account settings
System administrators set the login security policy for users on the Account Settings page for users that are authenticating with Ringtail Authentication. Complete these settings before proceeding with Active Directory and all other user administration tasks.
Use the procedure described in the following table to set the login security policy.
|
Step |
Procedure |
|
1 |
On the Portal Home page, under Portal Management, click User Administration. |
|
2 |
In the navigation pane, click Account Settings. |
|
3 |
Type the following: Minimum password length: The required minimum number of characters in a password. Password expiry: The number of days before all users' passwords expire. Password history: The number of times users must create a unique password before it can be reused. Password complexity: The level of required password complexity. Select one of the following options from this list: Disabled: No complexity requirements. Alphanumeric: Passwords must contain letters and numbers. Alphanumeric with symbols: Passwords must contain letters, numbers, and special characters. Maximum login attempts: The number of times users can enter incorrect credentials before accounts lock. Account lockout duration: The amount of time that users must wait before they can attempt to log in after exceeding the maximum number of attempts, in minutes. Inactivity session timeout: The amount of time that users can be inactive before they are automatically logged out, in minutes.
|
|
4 |
Select the Disable legal disclaimer check box if you do not want users to see the legal disclaimer each time that they log in. The disclaimer will still appear at each user's first login, but not for subsequent logins. |
|
5 |
Click Save. |
Configure Identity Provider Settings
This configuration page is for Active Directory authentication through Nuix Discover’s traditional web site authentication. These settings do not apply to AD authentication when using the Nuix Discover Login Service.
The following list describes the available features and tasks when you authenticate with Active Directory:
Self-service password system: If you incorporate a self-service password system, configure Active Directory to work with the system. The self-service password system can be enabled or disabled. This feature is not commonly enabled.
Domain user import: Import Active Directory users into the application. The domain user import feature can be enabled or disabled.
Add users to Active Directory: Add new application users to Active Directory. You can also add existing application users from each user's profile page. This feature is not commonly enabled.
Add users to the Active Directory case group: Use this group to manage file repository hare permissions. Only one Active Directory case group exists per case.
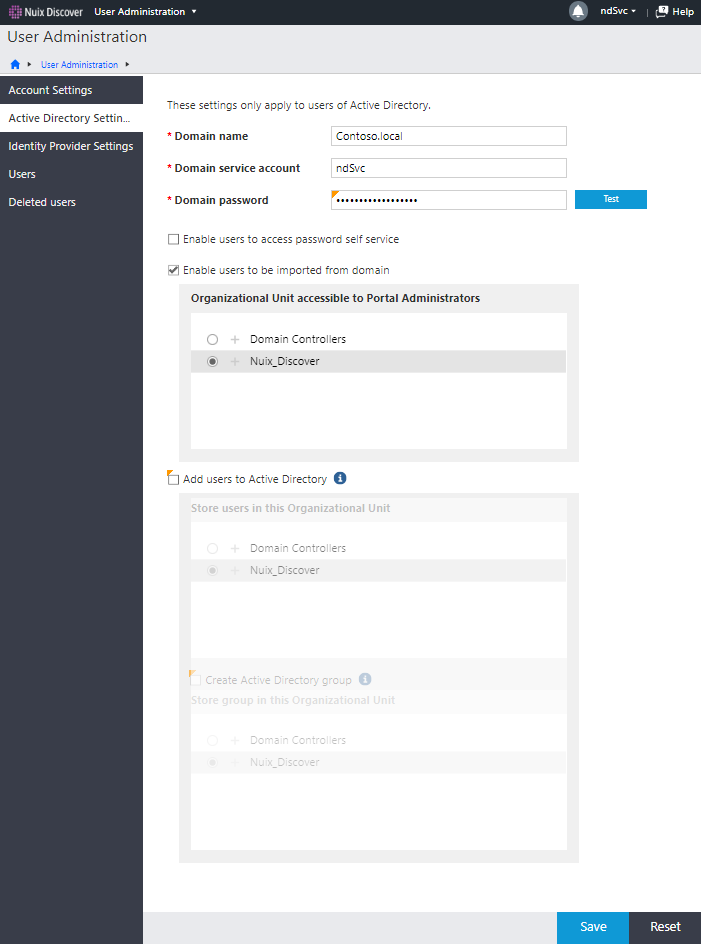
Active Directory settings
To work with Active Directory, the application authenticates with an Active Directory service account.
Domain name: The name of the Active Directory domain to which you want to connect.
Domain service account: The name of the service account you use to add and edit Active Directory users. This is typically the Nuix Discover Service Account as described in in the Service account section of the Planning chapter. For the self-service password feature to work with Active Directory, the Active Directory administrator gives the account write permissions.
Domain service account password: Create a password for the domain service account.
To add application users to Active Directory and to an Active Directory case group, you need the following:
Store users in this Organizational Unit: The organizational unit (OU) in Active Directory in which to create the users in. The domain service account configured above must have write permissions to this OU.
Store groups in this Organizational Unit: The organizational unit in which Active Directory in which to create the group in. When a user is assigned to a case in Discover, an AD group is created in this OU (if it does not already exist) with the same name as the case. The user is made a member of the AD group. The domain service account configured above must have write permissions to this OU.
Use the procedure described in the following table to configure the Active Directory settings.
|
Step |
Procedure |
|
1 |
On the Portal Home page, under Portal Management, click User Administration. |
|
2 |
In the navigation pane, click Active Directory Settings. Note: You will not see the Active Directory Settings page if your portal is configured to use Ringtail authentication. |
|
3 |
Type the Domain name. |
|
4 |
Type the Domain service account. The application uses the account to access Active Directory. |
|
5 |
Type the Domain password, and then click Test to authenticate the domain. |
|
6 |
Optionally, do any of the following: To enable the password system for users, select the Enable users to access password self service check box. To disable the system, clear the check box. Note: This optional feature is not commonly used. To enable the domain user import feature, do the following: Select the Enable users to be imported from domain check box. When importing, portal administrators can access one organizational unit only. Under Organizational Unit accessible to Portal Administrators, select the organizational unit that the portal administrators can access. To allow users to be automatically added to Active Directory, do the following: Select the Add Ringtail users to Active Directory check box. Under Store users in this Organizational Unit, select the organizational unit in which to store user accounts. To allow for the addition of application users to an Active Directory case group, do the following: Select the Create Active Directory group check box. Under Store group in this Organizational Unit, select the organizational unit in which to store the Active Directory case group. Note: This optional feature is not commonly used.
|
|
7 |
Click Save. |

Configure Identity Provider Settings
An identity provider configuration defines a method that the application uses to authenticate a user when the Nuix Discover Login Service is used. In the application, the configuration includes the authenticator, and, if needed, a second authentication method and additional configuration information. On the Identity Provider Settings page, the Nuix Discover system administrators can add, edit, and delete identity provider configurations, and assign the configurations to organizations.
Add an Identity Provider Configuration
On the Identity Provider Settings page, system administrators can add new configurations. Use the procedure in the following table to add a new identity provider configuration.
|
Step |
Procedure |
|
1 |
On the Portal Home page, under Portal Management, click User Administration. |
|
2 |
In the navigation pane, click Identity Provider Settings. |
|
3 |
Click Add. |
|
4 |
Click Add. In the Add Identity Provider dialog box, do the following: In the Configuration name box, type a name. In the Provider name list, select a provider. Depending on your installation, you could see Ringtail, Active Directory, or SAML for third-party identity providers. Optionally, in the Two-factor provider name list, select a provider name. Optionally, use the Configuration box to store configuration information that may be required by the identity provider. The value in this box should be in JavaScript Object Notation (JSON) format. Be sure to remove any line breaks that may have been pasted in before you save. To replace the current default with this new configuration, select Set as the default identity provider. Only one identity provider configuration can be the default for a portal.
|
|
5 |
Click Save. |

Additional information about configuring Identity Provider Settings
To configure your identity provider settings, please refer to the following documents on the Nuix Discover download site at download.nuix.com for more information:
Configuring Active Directory Federation Services with Nuix Discover for Single Sign-On
Configuring Okta with Nuix Discover for Single Sign-On
Configuring Duo with Nuix Discover for Two-Factor Authentication
Configuring Azure with Nuix Discover for Single Sign-On
Manage users
A user can have one of the following user categories in a portal:
System administrator: Full administrator rights to all features and cases across one or more portals in a system. There must be at least one system administrator.
Portal administrator: Certain administrator rights to one portal in a system.
Portal user: Can access a portal, where they can view and perform work in assigned cases.
Add users
System administrators can add users to the application by creating new users, importing users from Active Directory, or importing users from a file. Portal administrators can add users with a portal administrator or lower portal user category.
Note: You can also add users to Active Directory.
Optionally, you can have new users change their password and, if configured by the administrator, answer security questions upon their first login.
Use the procedure in the following table to add new users.
|
Step |
Procedure |
|
1 |
On the Portal Home page, under Portal Management, click User Administration. |
|
2 |
On the Users page, click Add. |
|
3 |
In the Add user window, on the Account page, type or select the following for the user, and then click Next: Name: Type a first name and last name. Organization: Administrators can select a provider or client organization. A backslash appears between the name of the provider organization and the name of the client organization. For portal administrators, when organization security is enabled, the list of available items depends on membership in a provider or client organization. Company: The company the user belongs to. Select an existing name or type a new company name. Category: The portal user category the user belongs to. A user can be a system administrator, portal administrator, or portal user. Email: An email address is optional, but if you select an Identity provider configuration with two-factor authentication (2FA), you must type a value in the Email field. Identity provider: Select an identity provider configuration. Note: If organization security is enabled, the available values depend on what you select in the Organization list. The list contains only identity provider configurations that are assigned to the organization. If organization security is enabled but no organization is selected, or no identity provider configurations are assigned to the organization, the list contains the portal default identity provider configuration. If there is no configuration assigned to the selected organization and there is no portal default identity provider configuration, the list is empty. User name: Type the name the user will use to log in to the application. Password: If an Identity provider other than Ringtail or Active Directory is selected, the Password field is disabled. |
|
4 |
On the Settings page, type or select the following: License this user: Select to license the user. Unlicensed users are unable to access the application. The check box always appears and is selected by default. Note: System administrators and portal administrators can have only one license. Portal users can have up to 10 licenses. Add user to Active Directory: Adds the user to Active Directory and into the organizational unit and case group selected on the Active Directory Settings page. Note: You will only see the Add user to Active Directory option if Identity provider is set to Active Directory on the Account page. The user name and password typed in this dialog box become the credentials for the user in both Ringtail and Active Directory. Note: If you entered an email address and company, this information automatically populates in Active Directory. Manage restricted user assignment: System administrators can configure restricted user assignments to help prevent conflicts of interest in the organization. System administrators can assign the management of restricted user assignments to portal administrators, who can assign the management to other portal administrators. To assign this right to a portal administrator, select the check box. The portal administrator can then designate a case as a restricted user assignment case. Note: You will not see Manage restricted user assignment unless you select Portal Administrator for the Category on the Account page. User must change password at next login: Select the check box to force a password reset the next time the user logs in. The check box only appears if Identity provider is set to Ringtail or Active Directory on the Account page. The check box is selected by default. |
|
5 |
Click Finish. If a message appears on the Account page, do the following: This user was previously deleted. Reinstate this user: The user previously existed and was deleted. To reinstate the user: Click the Reinstate this user link. In the Reinstate deleted user dialog box, make sure that the user is selected and then click Yes. This user name has been used. Increment user name: The user name is currently in use. Application user names must be unique. Click the Increment user name link to automatically add a numerical increment to the user name. For example, JoanUser becomes JoanUser1. |
Import users
Administrators can import users from an Active Directory domain or from a file. If importing from a file, you have the option to add the users to Active Directory.
Imported users appear on the Users page. The application creates a profile page and assigns a license to each imported user. If there are more users for import than available licenses, the users are still imported, but are unlicensed. A warning message appears to indicate the specific licensing and user information. Only licensed users can access the application.
Import users from domain
If your portal is configured to use Windows authentication, you can import users into the application from Active Directory. Only Active Directory users not currently in the application are eligible for import. The application also creates a report detailing the changes made to each user.
Portal administrators can import users from Active Directory, but the system administrator designates only one Active Directory organizational unit to which portal administrators have access.
You must configure the Active Directory settings in the application before importing users by domain.
Use the procedure in the following table to import users by domain.
Import users from file
You can import users using an .xls, .xlsx, or .csv file. The file should contain information in columns, in the following order: First name, Last name, User name, Email, and Company. Email and Company are optional. You can download a template that contains the required column labels. Optionally, you can add imported users to Active Directory. Portal administrators can import only to the organizational unit selected by the system administrator.
The application creates a report detailing the changes made to each user. Use the procedure in the following table to import users by domain.
|
Step |
Procedure |
|
1 |
On the Portal Home page, under Portal Management, click User Administration. |
|
2 |
On the Users page, click Import. |
|
3 |
On the Import Source page of the Import users window, select the File option. |
|
4 |
To download the template and create an import file, do the following: Click Download template. Open or save the template. Complete the user information for the users you want to import. Save the file to your computer. |
|
5 |
In the File source box, click Browse and select the file from your computer. |
|
6 |
To add the users to Active Directory, make sure that the Add user to Active Directory check box is selected. Note: You will not see the Add user to Active Directory option if your portal is configured to use Ringtail authentication. |
|
7 |
Select the Organization to assign the users to. For portal administrators, when organization security is enabled, the list of available items depends on membership in a provider or client organization. |
|
8 |
Identity provider configurations are available in the Identity provider list. |
|
9 |
Click Next. |
|
10 |
Select users, and then click Next. When the identity provider configuration uses Duo 2FA, you see an error message when you select users that do not have an email address. To proceed, you must clear the check box for these users. |
|
11 |
Under User category, select the portal user category for each user. A user can be a system administrator, portal administrator, or portal user on the portal. |
|
12 |
Click Next. |
|
13 |
To optionally assign the users to cases, do the following: Select cases. For portal administrators, when organization security is enabled, the list of available items depends on membership in a provider or client organization. Under Case user category, select a case user category. A user can be an administrator, group leader, or group member in a case. Note: The Case user category applies to all selected users for each selected case. You can change an individual user's case user category on the Cases page in User Administration. |
|
14 |
Click Next. |
|
15 |
Do one of the following: If you did not select cases or do not want to add users to an existing case group, click Next. If you selected cases and want to add the users to an existing case group, under Case group, select the case group and then click Next. Note: If there are no groups in the case, the list is blank. A summary of the selected actions appears. |
|
16 |
Click Finish to complete the import. Note: When the identity provider configuration uses Duo 2FA, the application attempts to create new Duo accounts using the email addresses for any imported users for whom a Duo account does not already exist. Your company must already have licenses with Duo. |
|
17 |
Open or save the report. Caution: The report contains sensitive information, including user passwords. When the identity provider uses Duo 2FA, the application attempts to create new Duo accounts using the email addresses for any imported users for whom a Duo account does not already exist. |
Managing Deleted Users
User accounts that have been previously deleted in the application can be viewed on the User Administration > Deleted users page. By clicking the user’s name, you can see the details for the deleted user on the Profile page.

Reinstating a User
When viewing the details of a deleted user, an administrator can select the Reinstate this user check box, and then optionally select the License this user check box to make the user active again by then pressing the Save button.
Improve native audio and video display in Internet Explorer
This section applies to only Internet Explorer users. To improve performance when using Internet Explorer, all native audio and video files automatically play in Windows Media Player.
Use the following procedure to disable this feature for a case.
Note: When this feature is disabled, the native file viewer converts and displays all audio and video files in an .MP4 format.
Log in to Nuix Discover.
On the Portal Home page, navigate to Portal Home > Portal Management > Cases and Servers.
On the Cases page, click the name of the case whose options you want to set, and then click Case Options.
Clear the Use Media Player for IE users check box.
When this feature is disabled, the native file viewer converts and displays all audio and video files in an .MP4 format.
